Anatomy of First Android Application (Android-Part 2)
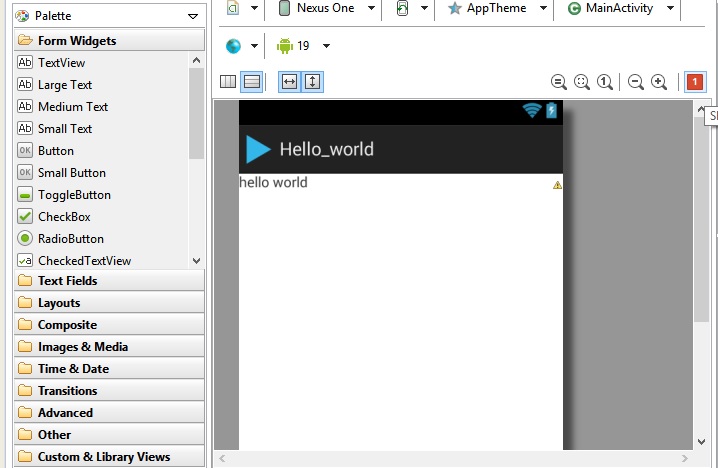
Hello Geeks, hope you all have read the previous post for setting up IDE, here we explain what each folder of a newly created Android Application means. As soon as you follow the steps described in previous post, a simple android application with the application name and a predefined string is created.The whole picture looks something like this (click on res/layout/activity_main.xml):
The basic structure of an android application looks like this :
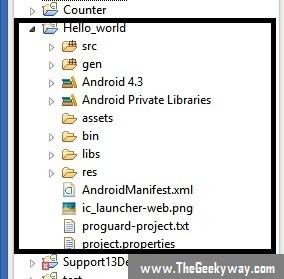
The highlighted part in the above image shows expanded form of a Android Project. On the top left of tree, we have the name of the Application itself. Under that we have the following folders :
- src : SRC means SOURCE. Source folder stores the source of your application. This folder stores name of the package and then the source file(s). Here we have MainActivity.java as the main source file, which opens on Right side.
- gen : Gen means Generated Java Files. The folder stores generated Java files like R.java . These are AUTO GENERATED JAVA FILES which should not be edited.If there is any error in project (xml/source), the file is not generated. So we must remove The files like R.java are used to map layout files from Layout file (XML File) to MainActivity file (JAVA File).
- Android 4.3 and Android Private Libraries : These are source files given by google, normally we do not require to do anything from these files. These are just imported, as required.
- assets : This folder stores the text files/HTMLs or databases related to your application.
- bin : As clear from the name, bin folder stores the binary output of your application i.e. the APK file which is sufficient to execute independently on your android device.
- lib : This folder contains one file by default (android support file). We can add any JAR files in this folder which may be used by our application. People who have worked with JAVA must be knowing how to include external jar files in application (by pasting in specific directories in C:/program files/java). This is just similar.
- res : res folder contains all the resources in your application. There are accessible in your application using its ID which is maintained in R.java (auto-generated file). Most of the people are often confused between res and assets, but here's the difference : Files inside assets folder are accessible in your java file as if it exists in the same folder, No IDs are created for asset files inside R.java. Whereas files in res folder are accessible using their IDs defined in R.java. Here is the explanation of each subfolder of res.
The first five subfolders in res (drawable types) consists of images of different sizes which may be used in your android application. Here hdpi means High Density Picture, mdpi means Medium Density Picture and so on.
The next folder(layout) is the most important which consists of the layout of our application. By default, it consists of one file (activity_main.xml). As we create more activities, more files are added here as per our specification.
The menu folder can be used to create a custom menu inside an Android Application. It is not discussed here in detail.
The values folder contains many XML files which define constant objects for your Android Application. Our main concentration remains on strings.XML file which stores constant strings. These strings are accessed in Java application using their ID (eg. R.string.app_name) where string is the strings.xml file and app_name is the constant string defined in that xml file (app_name defines the name of android app).
The other versions of values folder are used for different APIs versions. Other than this we have the AndroidManifest.xml file which defined basic information about the Android Application.
Eclipse allows two views of an XML file which can be toggled by the TAB given below the XML file as shown here :

The last tab (AndroidManifest.xml) represents the XML view of the file whereas the first four tabs (Manifest, Application,Permissions and Instrumentation) represent the GUI view of the file. This is the advantage of using Eclipse IDE, i.e. for adding some new information to manifest, when we don't know the syntax, we can use the first four tabs so that we enter the information using GUI and Eclipse automatically adds the same information to the XML file.
The rest of the files describe basic properties of the file and do not require immediate discussion. So we defer this to future posts, they would be discussed as or when required. The next article describes how to create an Android Virtual Machine on your system to execute this created Application.